Wednesday, February 29, 2012

Victory Through Grapefruit

Well, I'm not one who should give cleaning advise.  I'm not a cleaner or an organizer.  It's odd that I've been doing a bit of both in the last few days.  The organizing has been a failure,  but the cleaning has given me a small victory.  I'll start with the victory first.

Grapefruit...  We have been eating a ton of it.  This is wonderful in so many ways,  however it's kind of annoying when I have to empty the compost bucket four times a day.  It's the middle of winter and my compost pile is not conveniently located.  I figured out something useful to do with all the grapefruit peelings and it has to do with cleaning my house.  VICTORY.

Take your citrus peels and let them dry on the counter for a few days.  Then grind them up in your food processor.  What you end up with is grapefruit powder.  You can use this powder to clean your bathroom sink or tub or counter-tops.  I mix mine with a bit of baking soda and use a scrubber.  It smells really good and it's anti-bacterial too.


I also want to try this too.  Put all your grapefruit peels in a jar and cover with vinegar. Let it sit for a month, then strain and use as an anti-bacterial spray.

And now to the failure.  I realized yesterday that my cupboards were full of empty jars and small, opened baggies of lentils or beans.  I had the idea of putting the contents of the random little baggies into the jars, therefore eliminating the empty jars and the little baggies.  Brilliant, no?

What I ended up with was a cupboard full of this...


The jar full,  but still the little baggy of stuff.  My hopes and dreams shattered.


This post was shared at adelightfulhome.com your green resource Thursdays.

Thursday, February 23, 2012

On the Bandwagon - with a recipe

We jumped on the bandwagon my friends.  The wheat-free bandwagon that is.  Alex has been dealing with a lot of pain with digestion lately so we figured a good over-haul of our eating was in order.  So,  we have cut out all of our breads and pastas.  Any grains we do consume I try to soak them first,  but this is proving difficult to remember.  We have been eating tons and I mean tons of fruit and vegetables.  It really is wonderful.  We also eat lots of meat,  which is a nice bonus for Alex as he was kind of tired of my meat - stretching ways.  It's also nice that we just filled our freezer with half of a grass-fed cow.  We are also trying to keep up in the probiotic department,  eating yogurt and kefir regularly.
The results have been pretty much amazing.  Alex doesn't have his bouts of gut pain anymore,  I feel energetic even though Bennett keeps me up all night. and, I think Indiana's eczema is getting better.  I still find it a little hard not to eat pasta, but I've been replacing it with potatoes.  This is what we ate tonight.  It was pretty good.

Mushrooms, Meat and Potatoes in my Crock Pot 

1 big chunk of round steak
1 cup of sliced mushrooms
3 or 4 potatoes sliced.

Throw all of this in your crock pot.

Jalapeño ketchup.

2 jalapeños, seeded and diced
2 tbsp minced onions
1/4 cup water
1 tsp cumin
3 tbsp ketchup.
in a small saucepan boil jalapeños, onions and water until the jalapeños are very tender and mushy.
chop them up in a food processor and add cumin and ketchup.

Drizzle the ketchup over the meat and potatoes.  Cook on low 8-10 hours or high 4-6 hours.
Just so you know,  this is not spicy,  the jalapeño ketchup just gives it a very nice flavour.
Serve with homemade sour cream or homemade ranch dressing.


Monday, February 20, 2012

Crack pot for my Crock Pot.

I'm passionate about a few things.  One of them is my crock pot.  It may be a little weird, but it is what it is.
I think I would be able to operate my kitchen with only my crock pot and a hot plate.  Who needs an oven?  I don't.

                                                                 My well loved Crock Pot.

Five things you can cook with your Crock Pot.

1.  Beans! Beans! Beans!
Don't buy canned beans,  dry is way cheaper.  Put a bunch of dry beans in your crock pot.  Cover with water and let them sit over night.  The next day,  strain them and give them a good rinse.  Put the beans back in the crock pot and cover with more water (about an inch over the beans) and cook on low all day.  You can check them after about 6 hours and see how they're doing.  You may need to add more water.  Different beans cook in different ways.  When they are soft,  strain them and rinse them and let them cool a bit then you can put them in a big ziploc bag and put them in the freezer.  Then just use them the same way you would canned beans.

2.  Meat
Throw a big chunk (or chunks) of meat in the crock pot, and cook.  Chop it up and freeze it.  This is so handy.
Did you know you can even cook hamburger in your crock pot?  Just put your ground beef in the crock pot,  don't break it up, you want it to stay in a brick shape.  Cook on high for about an hour or two, then turn down to low for a few more hours.  Check doneness with a meat thermometer. There will be a lot of liquid,  drain this out and then break up your ground beef.  This is really good to have in your freezer for spaghetti sauces and stuff.

3.  Baby Food
We're getting close to that time again,  another month or two and I'll be making baby food all the time.  The crock pot can be helpful for making some of the pureed vegetables.  Sweet potatoes, carrots, applesauce can all be done in the crock pot.  Just peel and chop your whatever and put it in the crock pot with a little bit of water,  cook on low.  When they are soft, just mash them up.

4.  Chicken Stock
After an evening of pigging out on chicken,  put the carcass in your crock pot,  add some celery, carrots or onions if you want,  cover with water and cook on low for like 24 hours.  Strain out the liquid and if you feel like it you can pick the meat off the bones.  Put the broth in jars or old yogurt tubs and freeze.

5.  Yogurt
I've been making my own yogurt for a few years now.  I have never tried it in my crock pot.  I'm a failure.
Here is a good tutorial on Crock Pot Yogurt.


Shared at Domestically Divine Tuesday, Healthy 2day Wednesdays, and Frugal Days, Sustainable Ways., and Things I Love Thursdays.

Thursday, February 16, 2012

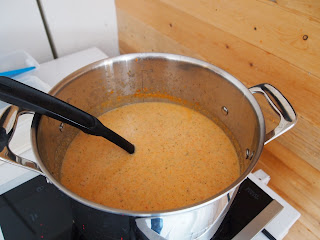
Cream of Fridge Soup

We've been eating a lot of soup for lunches these days.  It's winter time,  it seems like the right thing to do.  This is just a basic recipe for vegetable soup,  as in every vegetable in your fridge soup.

Start by cutting up all the vegetables you have lying around.
In this particular soup I used;
broccoli
cauliflower
onions
red peppers
carrots
I meant to use kale,  but seemed to have forgotten.

There are no limits,  you could use celery, sweet potatoes, potatoes,  spinach,  green beans  whatever you have.

Put all your vegetables in a pot and add chicken broth right up to the top of your veggies.


Of course I don't have any chicken broth because we've been eating too much soup these days that I can't keep up with homemade broth.  I just used water,  and it was just fine.  You can add any spices you think will fit.  For my soup I added curry powder and cumin and lots of salt.


Cook your veggies until they are soft, then blend them up with an immersion blender.


Add cream,  or homemade sour cream would be delicious (and nutritious)  or you could try homemade coconut milk if you have a curry soup.  Then most importantly,  serve with cheese.

This was shared with Recipe Swap Friday at grocerycartchallenge.blogspot.com and Real Food Wednesdays at kellythelitchenkop.com

Wednesday, February 15, 2012

Lazy Post

There are a few things I have yet to try in my bathroom cupboard revolution journey.  Call it laziness, fear, exhaustion,  what ever you want.  I just haven't been able to let go of a few lingering commercial products in my bathroom cupboard.  Here are a couple things I've been meaning to try.


Body Wash,  I'm almost out of my old stuff,  so I think I'll be trying this soon.

Done!

Tuesday, February 14, 2012

The 'No Poo' Craze

I love gettin' in on the craze.  Going without shampoo (no poo,  as the cool kids call it)  seems to be all the rage these days.  Even though I'm not really a 'rage follower'  I say it's about high time we stopped using shampoo.  And if we all followed this trend,  imagine what would happen.  We might have clean drinking water.  We might not leave an ocean full of plastic for our kids to clean up.  AND..... We might have better hair...gasp.

The truth is we do not need to shampoo our hair and we don't need to condition it either!  I hear a chorus of naysayers whining "but if I don't use shampoo everyday my hair is a slithery slimy mess."  Well,  maybe that's BECAUSE  you use shampoo everyday my naysayer friends.  God created us wonderfully and He designed our scalp to create oils that nourish and repair our hair.  When we use shampoo we wash those oils away with harsh chemicals that dry out our hair even more.  We then need conditioner to coat our hair with oils basically to hide the damage that has been done by the Shampoo.  After a day or two,  these conditioner oils and our natural scalp oils mix together and create the slithery slimy mess that makes us use shampoo again.  It's the never ending soda.

If you are still not convinced,  please read this post by someone who can explain it a lot better than me.

So,  the first step.... Stop using shampoo!!!  that's simple enough,  except not really.  Our poor little scalp has been mistreated for such a long time that it is used to spitting out WAY too many oils in a futile effort to stop the madness.  Our scalp will continue to spit out way too many oils until it is finally convinced that we won't use shampoo again.  This will take awhile (like six weeks or so)  Don't give up.  Buy a nice hat.
Wash your hair with a paste made from baking soda and water as often as you need to.  This actually does clean your hair quite well. If you need to condition use a mixture of 1 Tbsp apple cider vinegar and 1 cup of water.  Stick with it,  your hair will do some crazy things while it's adjusting.  In the end you will have the hair you never knew you had.  For instance,  my frizzy poodle top is gone and now my hair is just curly, maybe  only wavy.

If the baking soda thing doesn't work for you (which it doesn't for everyone) please read crunchy betty's alternative.

This was shared at Things I love Thursday at thediaperdiaries.net, Your Green Resource Thursdays, and Simple Lives Thursday.

Monday, February 13, 2012

Body Butter

I think this week I'll get back to the bathroom cupboard revolution I mentioned a few weeks ago.  In my journey to revolutionize my cupboard this is one of my biggest surprises.  Body Butter,  who knew I couldn't live without it.  I used to use whatever lotion I had around,  usually heavily scented and full of alcohol so it would sting my poor little legs.  When I first made this recipe for body butter I was put off by the greasy-ness on my hands.  But, I realized  it's body butter,  it's not for your hands it's for your body.  It feels so nice after a shower.  I've become addicted and I just made my second batch.

Oh So Wonderful Body butter


3 Tbsp cocoa butter
2 Tbsp coconut oil
2 Tbsp olive oil
1 Tbsp beeswax

Put all ingredients in the jar you want your body butter to live in.

                                                                Sadly,  this is the only picture I have of this process.


Place in a pot of boiling water and wait for everything to melt.

Take your jar out of the boiling water and give it a good stir.

Put the jar in the refrigerator  for about an hour or until it has hardened.

There you go, there's nothing to it.

This was shared at Domestically Divine Tuesday at aboverubies.net, Healthy 2day Wednesdays, and Frugal days Sustainable Ways

Friday, February 10, 2012

Coconuts!

Remember this post where I talked about making my own coconut milk?  Well, I was using shredded coconut that I bought in a teeny tiny package for alot of money in the organic section of my local grocery.  I am proud to say,  I am now much older and wiser my friends,  I am ready to take it to the next level.  Here we go,  lets make coconut milk from and actual coconut.  What the What!?!?!?!?


Here are two of my cuties holding a real coconut.  See the three black spots?  Those are the eyes,  they are the weak spots in the shell.


Drill a hole in each of the eyes. (holding the coconut with your feet is optional,  but you'll feel a bit more like a monkey)


Next, drain out the coconut water into a glass.  For future reference,  coconut water is like nature's Gatorade so if you ever find yourself on Survivor and you haven't been able to find your water source and you fear your end will come while on reality television,  have no fear,  just find a coconut and you'll be right as rain.


Wrap the coconut in a towel, grab a hammer and hit away.


We found that if we broke the coconut into smallish pieces it was pretty easy to separate the meat from the shell with just a butter knife.  The meat will have a brown papery substance on it,  that's okay,  you can eat that.  You can throw your chunks of coconut into a food processor and grate them up and then make your coconut milk like you normally would.


This post was shared at Simple Lives Thursday at gnowfglins.com

Monday, February 6, 2012

My Own Italian Dressing Made With Love

If you've been reading my blog you will know that I'm trying to change the way we eat around here.  More specifically I want to get rid of the processed foods and replace them with lovingly homemade food.  I realize this is not a new idea and there are plenty of others who have been doing this for years.  Me, I'm just starting,  please forgive me if some of these ideas are old hat to you.  These are baby steps my friends.

Homemade Italian Dressing


I used this recipe, I think it's a keeper.

Homemade Sour Cream - Can It Be So Simple?

I love me some sour cream.  It's a staple in our home,  it can not be done without.
I seem to have passed on this love to my kids.  This is Indiana eating sour cream by the spoon full in a restaurant,  we're classy like that.


This recipe is so ridiculously easy,  I have no idea how I've gone 30 years without knowing about it.  Making your own sour cream,  who knew?

All you need is cultured buttermilk and whipping cream.


Take a clean 1 quart jar,  pour about 1/2 cup of buttermilk in the bottom then fill with whipping cream,  stir really well, put the lid on and let it sit on the counter for 12-36 hours. You should keep your jar in a warmish area of your kitchen away from cold drafts.  I keep mine on my stove, that way I won't forget about it.


You will know it is done because it will thicken up to a nice sour cream consistency.  It will also thicken a bit more in the refrigerator.   That's it.  You have your own sour cream without all the added stuff that comes with store bought.  And, all those bacterial cultures are really good for you. You can use your sour cream as a starter for your next batch as well.


This post was shared at Real Food Wednesdays,  Healthy 2day Wednesdays,  and Frugal Days Sustainable Ways.